Guide: How to Connect to a Dedicated Server Using Windows via RDP
Introduction
Welcome to our step-by-step guide on how to connect to a dedicated server using Windows via Remote Desktop Protocol (RDP). Whether you're an IT professional or a novice user, this guide will help you establish a secure connection and access your dedicated server seamlessly.
Step 1: Get the Necessary Information
Before we begin, it's essential to gather the following details:
- The IP address or hostname of the dedicated server
- Your username and password for accessing the server
- The RDP port number (usually 3389 by default, but it may vary)
Step 2: Open Remote Desktop Connection
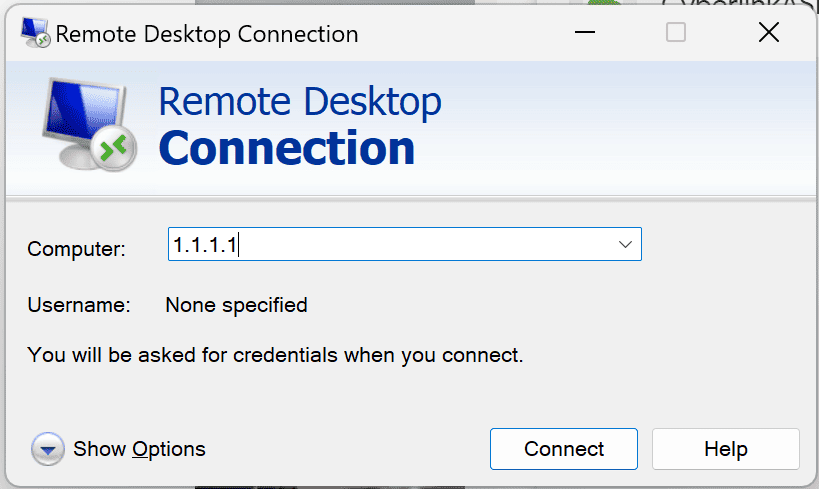
On your Windows computer, click on the "Start" menu and search for "Remote Desktop Connection." Open the Remote Desktop Connection app that appears in the search results.
Step 3: Enter the Server Details
In the Remote Desktop Connection window, you'll see fields to enter the server's IP address or hostname. Type in the IP address or hostname provided by your server administrator.
Step 4: Configure Advanced Settings (Optional)
If you need to change any advanced settings, click on the "Show Options" button. Here you can adjust settings such as display resolution, local resources, and more. Most of the time, you can leave these settings as default.
Step 5: Connect to the Server
Once you have entered the server details, click on the "Connect" button. If this is your first time connecting to the server, a security warning might pop up. Verify that the server's identity is correct and click "Yes" to proceed.
Step 6: Enter Your Credentials
In the login screen that appears, enter the username and password provided by your server administrator. Make sure to type them correctly, as usernames and passwords are case-sensitive.
Step 7: Customize Your RDP Session (Optional)
Once you're connected, you can customize your Remote Desktop session to suit your needs. For example, you can adjust the screen resolution, enable local resource sharing (e.g., printers, drives), or change other display options. These options can be accessed through the toolbar at the top of the screen.
Step 8: Disconnect from the Server
When you're done working on the server, it's essential to log off properly to ensure the security of your session. Click on the "Start" menu on the server, then select "Sign out" or "Log off."
Conclusion
Congratulations! You've successfully connected to your dedicated server using Windows via RDP. By following these steps, you can access your server securely and efficiently. Remember to follow any security protocols or guidelines provided by your server administrator to keep your connection secure. Happy remote server management!